


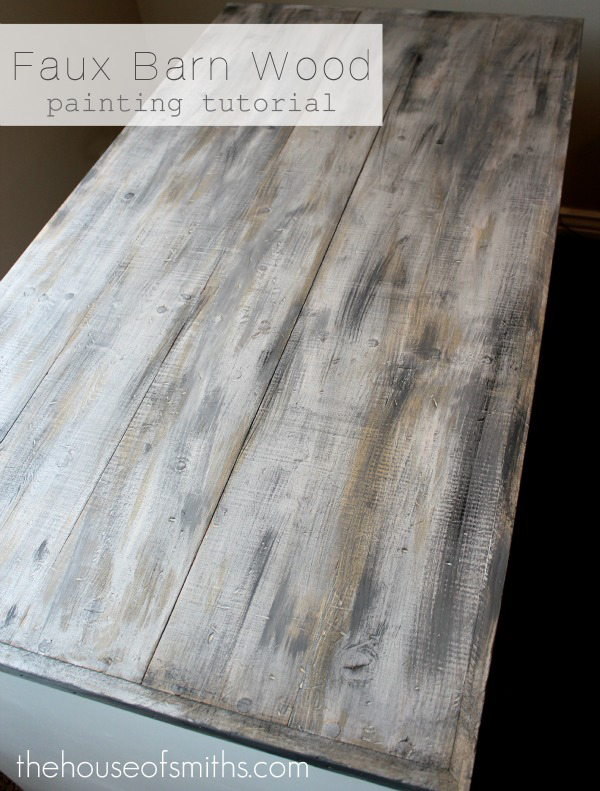
Faux Barn Wood Painting Tutorial
Okay folks, are you ready for the Faux Barn Wood Painting tutorial!?…
I ask if you’re ready, because there are about a trillion photos. ha! Even though this process is SO easy, and relatively quick… I wanted to make sure that I didn’t miss anything important that you may need to know, when attempting this barn wood look on your own.
If you remember from our last post, we custom built this worktable around two Ikea draw units.

At this point, if you’re not into the whole “barn wood look”, then you can just stain it, or paint it whatever color you want! But I love to mix different styles together, especially when they’re close to each other, to add visual interest, so I went all barn-wood-crazy on this tabletops be-hind!
🙂
I’m admitting right now, I am NOT a furniture refinisher/painter. It’s just NOT a skill that I pretend to posses. I mean… I’ll paint a small table, or an occasional frame, but I actually have most of our large furniture sent to my friend Sausha who sprays everything flawlessly, when I need something refinished really well.
I tell you this because there is NOTHING technical about how I came up with this finish. I was just messing around in the garage, pulling out cans of whatever I had on hand, until my scrap piece of wood looked juuuust right 🙂
I’ve broken this tutorial down into 4 main steps, so it’s easier to follow. But the great thing about this painting technique is that it can really vary in color however you’d like! Darker, lighter, more or less ‘distressed’ looking. Just play around with it and have fun!
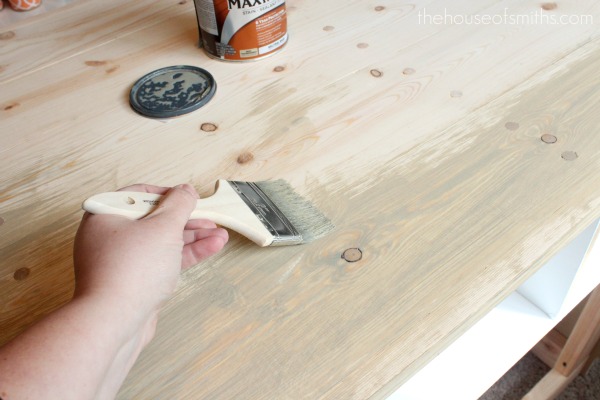
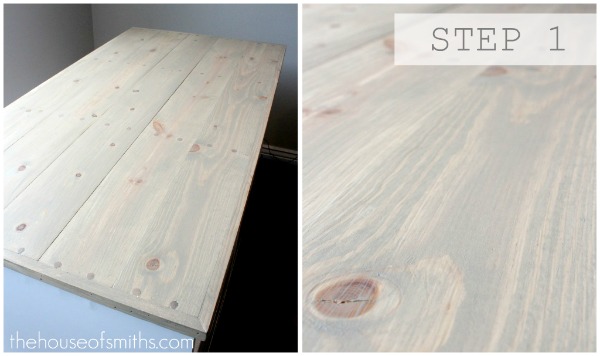
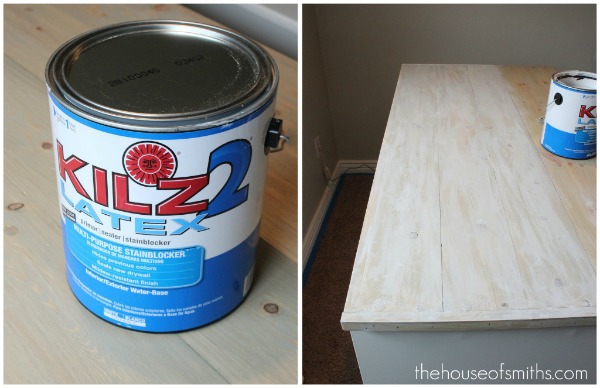
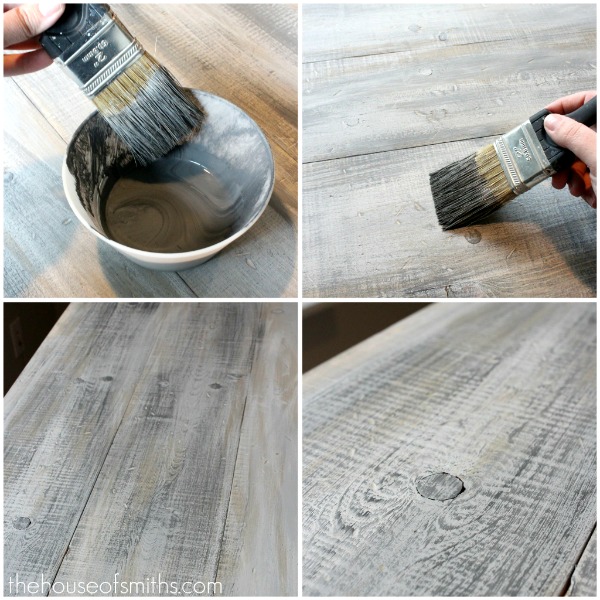
STEP 1:
* Sand your wood surface well
* Wipe it down to remove any dust or debris
* Use a cheap $1 paint brush to apply a generous coat of Olympic brand Weathered Barnboard stain.
* Do not wipe any off. Just let it sit on wood, until dry to touch. (about 10 minutes or so)

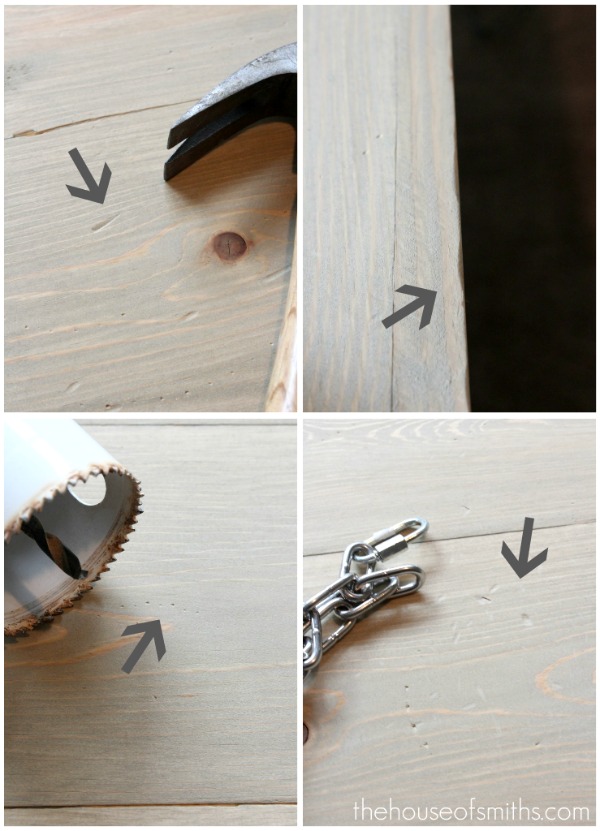
OPTIONAL STEP:
To get a more distressed, old, worn look on new wood, use any sort of random tools you can find with interesting shapes, and take your aggression out.
🙂

You can see here all the different types of grooves and dents that the different tools and objects made.
I used the back of the hammer for the top of the table, and the front part of the hammer to bang up the wood around the edges a bit, so it didn’t look so ‘perfect’.
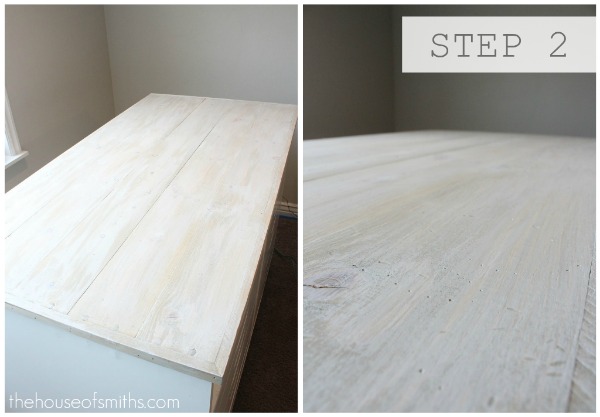
STEP 2:
* Use any latex primer with a large foam craft brush and lightly brush a dry coat of primer on the top of the barnboard stain.
* You don’t want the primer to cover the wood completely at all. You are mainly just using it for it’s white color and matte finish, to achieve a layered, weathered, gray look for the end product.

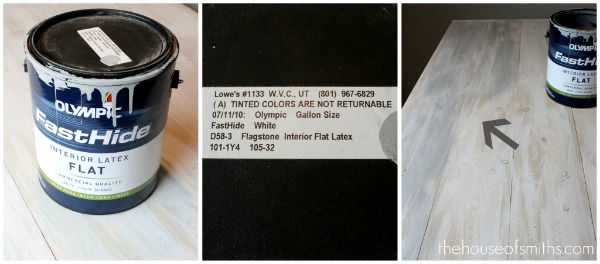
STEP 3:
* Use flat gray paint in any shade you choose.
I used some of the flat gray Flagstone paint from Olympic that we had left over from our Pantry Makeover… but really, any flat finish gray paint will work, as long as you’re okay with the shade.
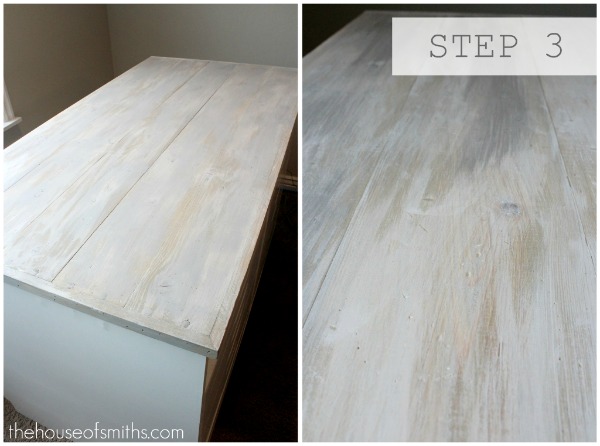
* Use a paintbrush, dip the end into the paint, and then wipe most of it off on either the side of the can, or a rag of some sort. Then use whatever leftover paint is on the brush, to dry-brush over the primer coat.
Basically that just means that you’re going to lightly whisk your brush over the surface of the boards. You are NOT painting and covering the entire surface, you’re just trying to create the look of different layers on the boards… like if wood would have been out in the elements for a few years, and repainted a couple of times.
* Keep in mind, flat paint will dry lighter. I actually did 2 coats of this gray, because I wanted to deepen the color a little more in some spots. You’ll just have to play with your color and see how YOU like it.
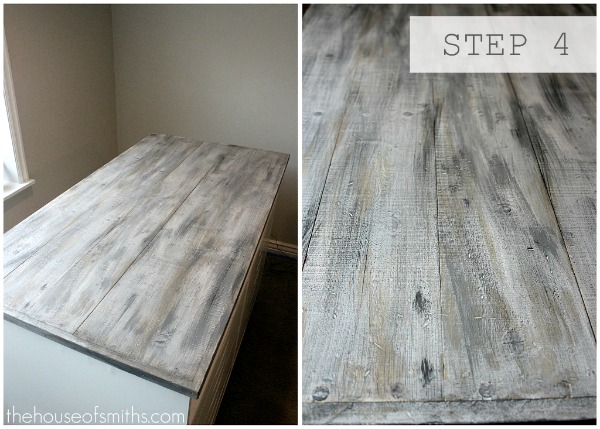
STEP 4:
* Using some of your leftover flat gray paint, add a dollop of black craft paint to the mix. Stir it around a little to deepen the color, but leave a little of the black paint around the edges, so that when you dab your paintbrush in, you’ll get subtle variations of dark and light on the ends of the bristles.

* Using the same technique, of dabbing your brush into the paint, and then wiping most of the excess paint off, dry-brush over the entire surface again. Periodically reloading your brush with more of your gray and black mixture.
* If you want more dramatic black or darker gray streaks on your wood, just pour a little more black craft paint into the mix, until you get your desired shade.
REMEMBER: You CANNOT mess this up!!!
🙂
As long as you use a light dry-brush technique for each layer, and resist the temptation to keep going back over each board before it’s dry, then you’ll do awesome! (if you keep going over and over the same brush stokes in your layers, you’ll get a muddy clouded look instead of a “worn wood grain” look). Each coat of paint will dry SUPER fast, because you’re not adding enough paint to actually make the surface really wet. And BECAUSE the paint dries so fast you can achieve that streaky, multiple layered look quickly!
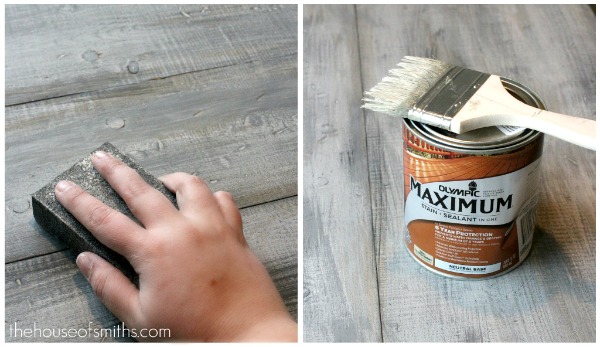
After you’ve got your desired barn wood look, sand down your surface very lightly to get rid of any rough paint splatters or bits that may have been left behind. This should be so light that there shouldn’t really even be any dust coming off your table.
The last step is to apply another coat of your Olympic weathered barnboard stain to the top of your wood. You can do a full coat of the stain, but I just used the dry-brush technique again and ran the stain lightly over the whole surface. Adding the stain to the top of the mostly dry latex paint will almost give the surface a greenish-gray tint. Helping add to that worn look that you’re going for.
Honestly, this is one of the EASIEST, fool-proof painting projects that I’ve done. PLUS you feel all artist-like… mixing paint and flailing your arm around, quickly dry brushing everything.
🙂
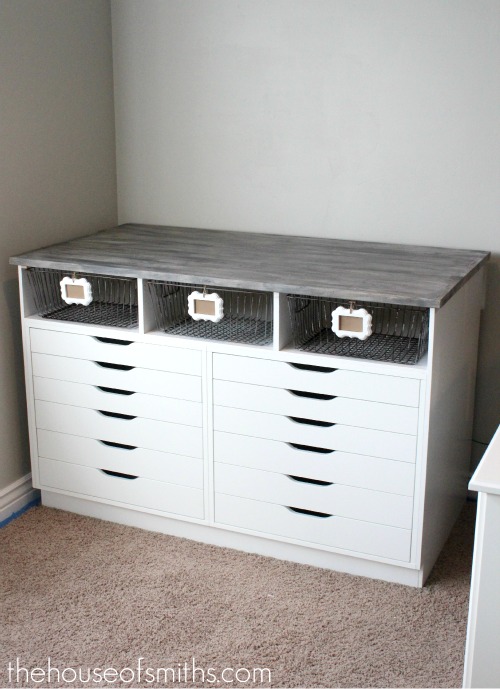
Here is what the finished product looks like from further away. I haven’t put a clear coat on the wood yet, but I plan to. The surface is actually really smooth, and I guess it doesn’t matter if it gets banged up a little, but I just want that extra layer of protection, since I’ll be working on this tabletop often. I’ll probably go with a satin poly finish.
Good luck everyone, and remember to get creative with your barn wood painting! That’s the fun of it!
🙂
Linking up at these fabulous parties!:

Restyled Vintage says
that looks great Shelley, what an awesome tutorial!
Nancy@owensolivia says
Thanks for the tutorial Shelley!
Jennifer Spadaro says
It looks so beautiful and I'm so jealous! My husband can't build anything! Boo. Enjoy! Have a fabulous day!
Anonymous says
One word: Amazing!
Angie says
You're genius! Love the whole "look"…the baskets, the tags…and of course the awesome "barn wood"! Have a great day!
Abbey D. says
WOW! Amazing work on that! I cannot WAIT to see the final review. I saw you on HGTV the other day…you did a fantastic job. I really hope to meet you in person at SNAP!
imsteelefullofscrap says
Great tutorial thank u
Jennifer@frombehindthepicketfence.com says
Wow, that really turned out great! And I love the frames on the baskets. I can't wait to see this room all put together!
Jennifer@frombehindthepicketfence.com says
This comment has been removed by the author.
The OCD Lifestyle says
I love love love it! And, the baskets are the icing on the cake. Great job once again. Y'all are full of creating talent. 😉
Kristin
Anonymous says
i love this technique! thanks for sharing! my boyfriend and I just finished up a wood chest for our basement and I wanted to do a rustic barnyard wood finish on it…this would be great on it!!
Pitter and Glink says
I love this! Your tutorial is really easy to follow too, so thanks a million! 🙂
Sarah @ Cozy.Cottage.Cute. says
So going to try this on something. Hmmmm, now what project should I start now…. hahahaha.
Looks great!
Deanna says
Looks great and I love the contrast between the top and the drawers. You are so inspiring
sara says
i love it.
Brittney says
That looks awesome! I want one!!!
Jen and her men says
AH. MAZING! Love this! You are SO creative!!!!
reFresh reStyle says
It looks great, I love the treatment!
Debbie
Tori says
THANK you from the bottom of my heart! This is the BEST tutorial! Easy to follow and something I can wrap my pea-sized brain around. : )
Ann Porteous says
wow love the look! I think I would like to try this on a old board sign I am working on!
Jennifer says
<3 it!!!!
live and luv says
Love how it turned out! I've done some dry brushing in the past and I've always been happy with the outcome.
Kristen says
I'm normally not a huge barn wood fan (you know, splinters termites and bugs) but I really love how yours turned out! Gorgeous!
Craftina says
i LOVE IT! I think i may attempt this one for my scrap room! Thanks for the great tutorial!
The Tuscan Home says
What a great tutorial. You make it look so easy. =) Love the finished look. ~Liz
Craftina says
I LOVE it! I think i may attept this one for my scrap room! thanks for the grea tutorial!
Unknown says
Wow, I like it! I've often thought about somehow refinishing our kitchen table. It's one of those Ashley furniture natural colored wood tables that everyone has. Of course I could skip the distressing step since I think I have an adequate number of authentic scrapes and dents. It still wouldn't have the individual wood slat like though. What do you think?
Laura
cookiecrumbsandsawdust.blogspot.com/
Katie says
Great tutorial can't wait to apply what I've learned and try it on something in my home!
Unknown says
I love it!! Thank you so much for sharing how to do this!!!! 🙂
Laura at Ms. Smartie Pants says
Oh man that looks amazing! I love the contrast of the new with the worn and those baskets! I have done a treatment similar to this, it's hard to describe, you just have to play with it until it looks like you want it, but you explained it well! I can't wait to see the rest of the room!
Anonymous says
I absolutely love how the top turned out! Thank you for the tutorial! I cannot wait to try it!
Maria @ Craft Crazy Mom says
This is such a great idea! I'm going to have to give this a whirl when we move and I get my own craft room 🙂
Samantha says
looks awesome!!! 🙂
Petra says
Nice work — the barnwood looks great with the Alex cabinets! Now you just need some matching floors 🙂 Love the custom cubbies with their baskets and the juxtaposition of weathered with modern. For those not inclined to paint, apparently Michael's has some barnwood paper that looks real — you could just decoupage it on some plywood. See flickr.com/photos/sapphire8photography/4285928725/
Christie // lemon squeezy home says
This is so cool! Thanks for sharing!
Weathered Treasure says
This is beautiful! I love the final product. You should leave this way and not put the clear coat. The more banged up the more character it will have. Great job! I'm totally following your blog.
Andrea says
Love this look! Thanks for the step by step as well!
Andrea
the-blonde-ambitions.blogspot.com
Unknown says
Love this tutorial and how your cabinet turned out! Can't wait to try this technique.
Trisha says
Love the baskets! Where do you find baskets like that?
Taylor {CoverGirl + Converse} says
What a great tutorial! Your blog is fantastic! I'm really looking to your next post!
If you have the time, I'd love for you to check out my blog and follow!
covergirlandconverse.blogspot.com
Your new follower,
Taylor
Inspired by you says
Wonderful tutorial. I've got to try it somet ime!
Kim @ Savvy Southern Style says
What a great project. Thanks so much for joining my party!
Lil Mama Stuart says
I'm pinning this in case I want to make a backdrop for an in home studio 😉 Where are the itty bitty frames from?
toobright says
I think I can assume you made the whimsical labels for the wire crates too? If so, where is that tutorial? 🙂
B's Mommy says
Thank you for the awesome tutorial. I can't wait to try it out!
Where did you find the small frames/tags on the baskets?
Happy Day!! 🙂
Ursie @ Unique By U says
That unit looks amazing!! What fab storage!!!
The wood looks great! So excited to see the continued progress of your new office!!!
Thanks for sharing!
Anonymous says
that looks really really good. I was planning on making a top for my coffee tables (I have 2 tables side by side side that I want to have linked together icancraftthat.com/2011/02/coffee-table-enhancement.html) and this just might be the solution for the top. they are getting really banged up and I was contemplating replacing them but they are the perfect size for my room and for storing my Ottomans.
Great tutorial.
Erin
Stacy Risenmay says
Oh My word!!!That looks so real! And those baskets and tags are freaking adorable 🙂
Paola says
Hey! I found a link to the HGTV full episode:
hgtv.com/video/clean-freaks-video/index.html
You're welcome 🙂 Paola
Simply Jessabells says
Wow, looks great!!
Emily {Mrs. Bs Hive} says
Oh my gosh! I love this!! You are amazing, my dear.
White Lace and Promises says
Absolutely fabulous! Gotta do it! Thanks!
Kara @ June & Bear says
can't wait to try this. unfortunately i have to strip the table first, which i dread.
Simple Daisy says
I love..love…love it!! Just fabulous:)
Allison@FabRehab says
Wow, wow, wow!! Thank you for the tutorial!
A's Sweet Shoppe says
It looks so great! Can't wait to see the room come together!
Arlene says
Looks amazing with the baskets and the little labels!!
paige says
Wow, this looks awesome!! I can't wait to try your technique!
Candace says
looks awesome!! I look forward to catching up in a few weeks when things slow down for ya!! Also- any tips on organization for all the stuffed animals/toys?! Especially if you don't have a play room (me) 🙂
Susie says
Love, love, love the look of the white with the wood top. Looks wonderful! Where are the white drawers from?
Tay and Ash says
Hi there!
I have become a recent follower of your blog and I LOVE your style. Do you do any design consultation on the side? Also does your friend Shauna, whom you mention in your post run a furniture painting business or does she only do your stuff because she is a good friend like that?
Thanks,
Ashley
The {Prince} Family says
love!!!!!!
Val & Terri Galvan says
Wow, I can't get over how you take simple things and turn them into amazing awesome creative pieces of pure greatness!!! LOL! Seriousness! I LOVE this! What a great piece of furniture/storage for your new office! HATS off to you miss shelly!!!
Marnie says
That looks amazing!
Where did you get the tags/frames hanging from the baskets?
Kristi says
Hi! I found your blog last week, I think from Pinterest. I just wanted to say, WOW! I'm amazed at what you do, I've been all over your blog…yes, kind of stalking it…please don't judge me…but wow! You are amazing and so inspiring with what you do with your home. Just wanted to say hi, and thank you for all of these awesome tutorials! I'm afraid now my husband might come home and find me pulling something apart or tearing down a wall and if you don't mind, I'll just blame it on you if he gets made at me…would that be okay? 😉 Just kidding, but thank you for this amazing blog, I'm a new fan!
Wild Bluebonnets says
That would make for a great scrapbooking table…..hmmmmm Love it!
Jenni says
Looks great!! Where did you get the wire baskets? Love this look!
Jenni says
Love this look!! GREAT job. Where did you get the wire baskets?
life in red shoes says
I watched my neighbor drag hers behind her car 🙂
Meghan says
I love the way this turned out!! And the added baskets definitely make the piece! May I ask where you got the baskets and cute little frame labels? LOVE them 🙂
Melissa says
Ooooooo I love this!! Thanks so much for sharing your tutorial! I pinned this and will most definitely be using this technique!
Amy C says
This looks great!! I've wondered many times how to make the wood look like it's been weather, but I never thought of using just paint! Ha! Your table looks great, and I love the little baskets that you have in it too.
Amy @ The Happy Scraps
Unknown says
Thank you, thank you, thank you for sharing this tutorial!!! I absolutely love this paint technique! I am your newest folower, you blog is very inspirational and creative, great work!! Please visit my blog and say hello – I love to make new bloggy friends and follow me back if you would like to keep in touch 🙂
Heather @ settingforfour[at]gmail.com
Kim @ Plumberry Pie says
I'm lovin it! Thanks for the inspiration. Been wanting to do this look on a couple things back here at my homestead:)!
Kim @ Savvy Southern Style says
Sharing this as one of the features at my Wow party tonight. Thanks again for joining.
Morgan says
speechless. this is amazing & actually something i can & will do someday when I have the right project! thanks for sharing your genius 🙂
Pamela says
That looks fabulous! Thanx for the how to!
Anonymous says
Love it! Thank you for the tutorial 🙂
Carolyn
{my simple messterpiece}
Becca @ The Sassy Penguin says
This is a barn wood masterpiece! I never would have realized it was painted. Great job, I pinned this 🙂
Kathryn @ Over The Wishing Well says
Definitely going do this on my fireplace makeover.
Anonymous says
Hi: I just found you. Nice turorial! Do you happen to host any linky parties? I would love to show you some of my stuff that I've been working on. Thanks for a cool blog!
Sarah | Coffee and Cabernet says
This is really a great technique. How did you even begin to come up with it?!? Thanks for sharing.
Capturing Joy with Kristen Duke says
love that look!!!
Unknown says
nice work you've got there!
Unknown says
nice work you've got there!!:)
Cara says
I'm in charge of table signs for my cousin's wedding next weekend, and I wanted to do them in barn wood frames, but of course those are insanely expensive. Instead I got some cute unfinished wood frames at Michael's for $1 each, and I'm going to try your faux barn wood technique! Thanks so much!
Momsbusy247 says
What a great tutorial, I have been thinking about trying something on some new wood, you have inspired me.
Momsbusy247 says
This is great, I have been trying to figure out how to make some new wood look old and bam, here you are. Thanks so much.
Suz says
Can this be done with a "French Country Kitchen Table"? You know the one that has the wood table top, and sitting portion of the chair, but the legs and chairs are white? I hate , hate my kitchen set and want to do something different.
Suz says
I wonder if this could be done with the French country kitchen tables?
the ones that are white legs and backs of chairs and table. The table top and sitting portion of the chair is wood but the rest is white. I'd love to change it to look something like this.
Liz @ Quirky Vistas says
I just found your post through someone's Pinterest board I'm following. I love your line at the end as much as the project: "PLUS you feel all artist-like… mixing paint and flailing your arm around, quickly dry brushing everything."
Ha! It's so true and I would feel like my artist sister when I do that. How fun to have a project that creates such a sense of the dramatic. Love it. Hope you'll stop over and see me at Quirky Vistas sometime.
Li
Unknown says
Cool…I just bought a wooden workbench off Craigslist and wanted to do something with it…but nothing too "perfect" since it is, after all, a workbench. This would be awesome. Thanks!
Cassie {Hi Sugarplum} says
Great project — I'm working on something similar and appreciate your knowledge on it! and yes, I'm stalking your blog and countless posts. 🙂
Lea Ray says
I love this! Now instead of looking for some old barn wood for my bathroom vanity I am just going to do this. Thank you so much for this tutorial.
Callie says
I love the look of your faux barnwood! I wanted to do a rendition of it today, but couldn't find the Olympic weathered barnwood stain – where did you buy it?
I do a lot of projects with old fencing, like this: house-capades.blogspot.com/2012/07/hi-my-name-is-callie-and-i-built.html (we had a whole fence blown over in the tornado that hit our house this spring) and I think this look would be great even on my pre-distressed fencing wood – can hardly wait to try!!
Anonymous says
I also am having a hard time finding the stain to do this….i almost spent all the money on real barn wood so thank you so much for sharing this great idea 🙂 Please help us locate the stain!
bri.stanek says
Is there anyway I could make the stain like this but brown?
hooviedoovie says
Love this tutorial! Would love to know where you got the drawer unit. Looks like something I need for my craft room.
Thanks!
Janell @ House of Fifty says
Look at this! Fantastic, it looks wonderful on the cabinet and isn't it the best to have a surface that will only look better with use?!
squishysandee says
Did anyone find out where she got the wire baskets and frame labels? I never saw an answer to the question. Thx
House of Smiths says
Here is the post about that 🙂
thehouseofsmiths.com/2012/04/wire-basket-storage-with-decorative.html?m=1
Unknown says
Hi! I really love what you did here! It looks really cool! I have a question for you, my nephew has been wanting an American Flag for his birthday, and I was planning to make him one out of a wooden pallet. Can I use the same technique above by adding red and blue acrylic paint to the flat paint mix to achieve the worn/rustic look?? Thanks!!!
Anonymous says
Very cool! I appreciate your step by step, I will definetly give this a try. Thank you for the info!!!
Anonymous says
I love this kind of stuff! I have been doing different finishes for a while now and I find that using a paste wax like minwax sold everywhere, for the last coat gives it a really great feel and look. Put the minwax on heavy its hard and softens with the heat of your hands. Then let sit for about 10 minutes, buff the wax, try to get as much as you can out of crevises and cracks. Great look!
Ron says
You have no idea how long I've been looking for this technique, it is great finally reading how to do it. The finish is in many magazines, but never with directions or a posted website with directions on how to achieve it.
Thanks for leaving these directions I'm going out today and buy the supplies.
Ron says
You have no idea how long I've been looking for this technique. It is wonderful seeing it finally used, and not just on a piece of furniture in magazines.
Thanks for leaving these directions I'm going out today and buy the supplies.
harris says
Great post and its look wonderful. i like it. i live your style. thanks for sharing with us.
moonchild says
Where can the Weathered Barnboard Stain be purchased? I have tried Home Depot, Lowes, Sherwin Williams, ect. and no luck. Please let us know. Thanks!
Erin Mary says
This was totally helpful in my latest Pinterest adventure- thanks for sharing!
erindestratis.blogspot.com/2013/01/string-heart.html
Unknown says
Exactly the look I'm going for, and your tutorial makes it soo easy! Thanks very much for putting it together and sharing it 🙂
Anonymous says
You've done a wonderful job weathering that table top – just beautiful and I've got this linked to my weathered wood DIY post too today!
A Little Less You . . . says
I'll be doing this this weekend to top of some ikea nightstands. I'm so excited.
A Little Less You . . . says
Perfect timing to find this. I just got some ikea nightstands that i want to dress up so I'll be doing this this weekend 🙂
Heather says
Thanks for taking the time to show step by step, what you did. Great job! Great sharing! Now it is my turn to give it a go!
Unknown says
I absolutely love your work…not just the outcome of the wood – which is the EXACT look I am wanting to create…but also the way you do the step-by-step photo and explanation of how everything is done! TRULY BRILLIANT! Well done…I have bookmarked your page…definitely going to see what else you get up to!!!
PS – YOU ROCK! LOL
Natasha says
So I found the Olympic Stain at Lowes… Make sure you get the neutral base and they can add the 917 Weathered Barnboard tint to it(it's a semi transparent stain). I was not able to find a small quantity of the stain, they only stock the full size which is approximately $40.
Unknown says
That's super awesome! I'm also glad to see you're a Lowes customer!! *works at Lowes in paint dept* 😀 You shouldn't need to apply a top coat because the Olympic stain already contains a sealer along with a UV sunblock, mold and mildew resistant, scuff guard technology and its even waterproof!! With a guarantee to last you 6 years on decking and fencing, that table to should last for years after! c;
Unknown says
That's super awesome! I'm also glad to see you're a Lowes customer!! *works at Lowes in paint dept* 😀 You shouldn't need to apply a top coat because the Olympic stain already contains a sealer along with a UV sunblock, mold and mildew resistant, scuff guard technology and its even waterproof!! With a guarantee to last you 6 years on decking and fencing, that table to should last for years after! c; That's super awesome! I'm also glad to see you're a Lowes customer!! *works at Lowes in paint dept* 😀 You shouldn't need to apply a top coat because the Olympic stain already contains a sealer along with a UV sunblock, mold and mildew resistant, scuff guard technology and its even waterproof!! With a guarantee to last you 6 years on decking and fencing, that table to should last for years after! c;
Unknown says
The stain is at your neighborhood Lowes in the exterior stain section in the paint department c: it comes in a variety of colors and the paint desk will be more than happy to mix your color for you! She used a semi transparent stain and sealer from Olympic.
Unknown says
Hey to everyone, it’s my first visit of the blog site; this blog includes awesome and actually best info for the visitors.
Unknown says
Love this! Where did you get the mini white frames and bins?
Unknown says
Love this! Where did you find your mini white frames and bins?
Unknown says
Is there a way to add a layer of brown stain over top? Do you think it would mess up the textured/layered look? I am more of a fan of the brown stain, rather than the grey.
christa9198 says
Fantastic tutorial! I love this look. Can't wait to give it a try and I have the perfect coffee table just waiting to be finished!
Unknown says
I am curious about the stain and then paint, I recently stained wood with an all in one stain & sealer. Then painted over it with Latex paint. I had someone want to purchase a similar item so I checked with the manufacturer & they said that I should not paint over the stain/sealer combo. My piece is fairly new (2 months old) with no issues. How is your holding up? I really want to make more items with this combo as cabot makes some beautiful colored stains right now!
Unknown says
I just used this on a coffee table top and it looks great! Thanks for sharing! Can't wait to use it on some other projects.
Rachel says
My issue is this stupid fake wood.
After years of trying to decide if I wanted to give up this big entertainment center, I decided to give my idea a shot.
I removed the center doors and shelves. I installed a led 42” fireplace. All went smooth.
The unit is a dark reddish brown. It had gotten pretty damaged in my last move. I thought if I could lighten it up a little, adding a paint job kinda like old wood. I’ve don’t this to kitchen cabinets, also fake wood and they turned out great. Now? I can’t seem to get the front of this thing to do right. I am adding real wood to the sides. I painted the top of center lowboy tv stand black to blend with the fireplace and tv stand.
Right now I’ve painted it white, cream, hazelnut, grey, black. Another coat of white, and I stopped.
I wanted it layered. This area is 1”, 1.5”, 2”.
I’m also adding rusty color punched tin framed with 3” wood to the front doors. I’m adding color changing strip lights to the inside cabinets, (tin on front). I wrapped the damaged short legs with help twine, and have misc rusty add ons like small hanging barn stars, bells, and ordered rustic pulls(barn stars). I have a rusty large barn star, and looking for a weathervane.
Can you maybe give me some input to help me out? I could order one of those small rollers that look like wood?
If I can get the color right? I was going to finish with a poly stain wash.
Any input would help. Ty