


Thanksgiving Decorating and Crafts for the Home

When I posted photos of us putting up our Christmas tree on Instagram and Facebook last week I had some worried readers, wondering “What happened to Thanksgiving!?” Well, to be honest, I hadn’t planned on really doing a ton of decorating for Thanksgiving, but I couldn’t completely pass up this holiday! It’s the perfect time to reflect on all of the amazing things that we’re so lucky to have, for goodness sakes! 🙂 So I decided to do some really simple decorating, crafts, and even try my hand at a table setting or two.
Here’s what I came up with…

Cason and I won’t be hosting Thanksgiving dinner this time around, but I have always wanted to try a simple Thanksgiving table setting, and so… that’s what I did! When I saw these cute dishes at Tai Pan, I just KNEW I had to see how they would look together on the table at MY house 🙂
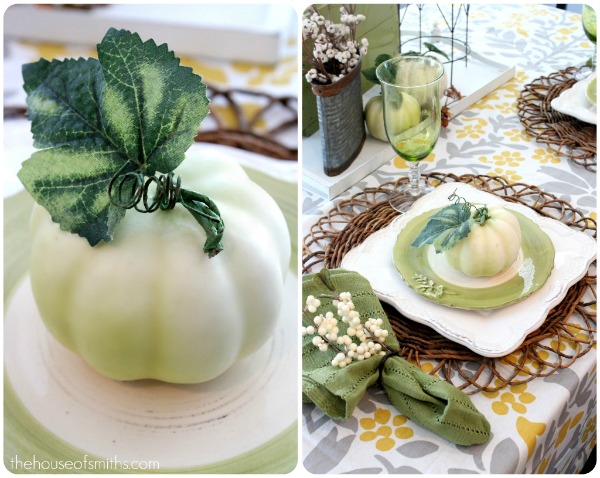
Table Cloth – Target. Pumpkins, Napkins, Plates – Tai Pan. Garnishes – Michaels Crafts. Placemats, Glasses – Pier 1 Imports
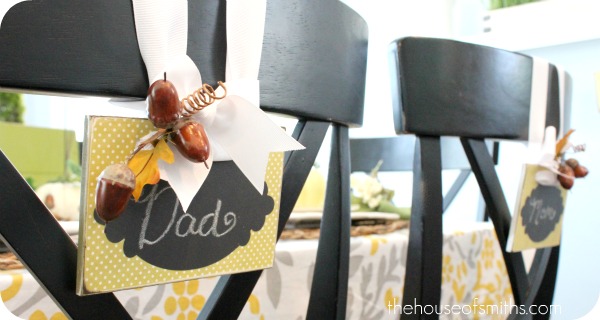
I may not be setting the tables for our Thanksgiving dinner, but I WILL be bringing the name place cards, so I wanted to make sure I had those all planned out. I thought that instead of just a regular name card on the table, I would find a cute way to hang them on the backs of the chairs instead! Big thanks to Amy who came up with the initial idea! (gotta love those creative friends. ha!)
Here’s what I created:
Simple wood plaques with scrapbook paper, a chalkboard vinyl decal and ribbon.
And, Yes! We WILL be selling the 6 wooden plaques with holes and 6 decorative chalkboard vinyl decals in our shop, so I thought I’d give you a full rundown of how I made these, step by step!
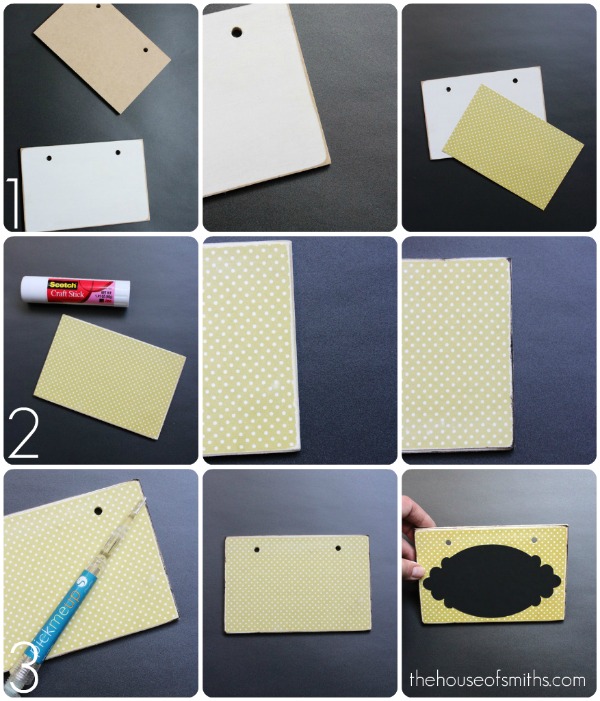
1. Paint the unfinished wood plaque with your choice of paint color. Sand the edges and pick a patterned paper of your choice to put on top.
2. Use some glue and attach your paper to the painted wood plaque. After it is dry, take the sand paper again, and lightly sand the edges of the wood AND paper, to soften up the pointy edges. At this stage, you can use some distress ink on the edges of your wood and paper if you’d like, to give it more of a worn look.
3. Take a pen or any other small tool, find the two holes in the wood, behind the paper and poke through the paper to reveal them. Adhere your chalkboard decal onto your paper, and you’re done!
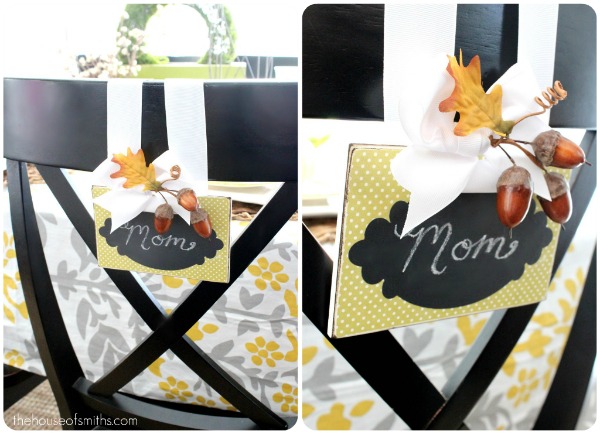
Not only do these name place cards leave your Thanksgiving/Party/Christmas table free for other things, like … yummy food,(ha!) but they are also great to reuse for LOTS of different events, because you can just erase the names and store them for your next get-together!

Our forever-changing kitchen shelves were the next thing that I wanted to spruce up with some fall/Thanksgiving goodness. I did all of this decorating in just a day, so I pretty much used decor that I had on hand from past projects (the twig star, grass arrangement, vintage window, etc…) and just added a few new elements.
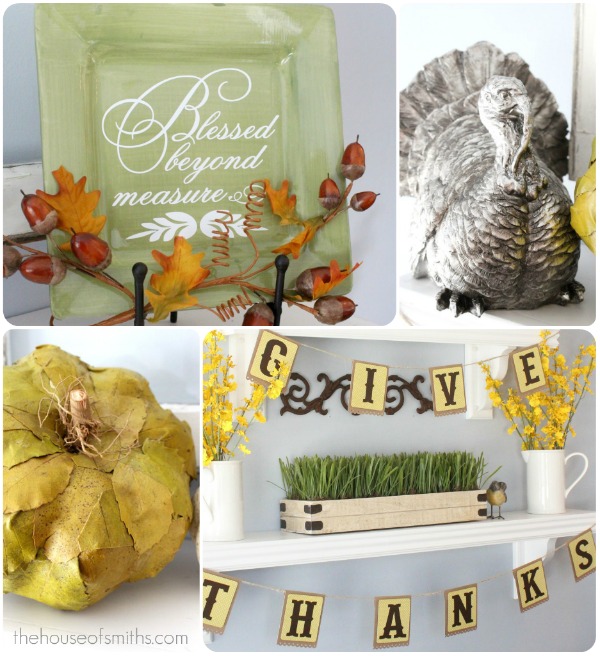
I loved the yellow that my flower blossoms currently added, so I left them there. But to “Thanksgiving-up” the place I added a few decorative pumpkins and this cute pewter turkey. I also took this green plate, that I picked up for about $2.00 from Tai Pan, designed a new Thanksgiving saying for it, and then just laid a small sprig of acorns and leaves across the bottom.
You can buy the vinyl saying for the plate, in our Design Shop, Here.
Another touch that I knew would make a big impact was the “Give Thanks” bunting decor. I’m actually going to call this project…
My under 20 minute Thanksgiving Garland. ha!
Seriously, I know that people have a TON going on during the holidays, but still need to decorate, so I wanted to make this garland SUPER easy for anyone to do.
Here’s how I did it:
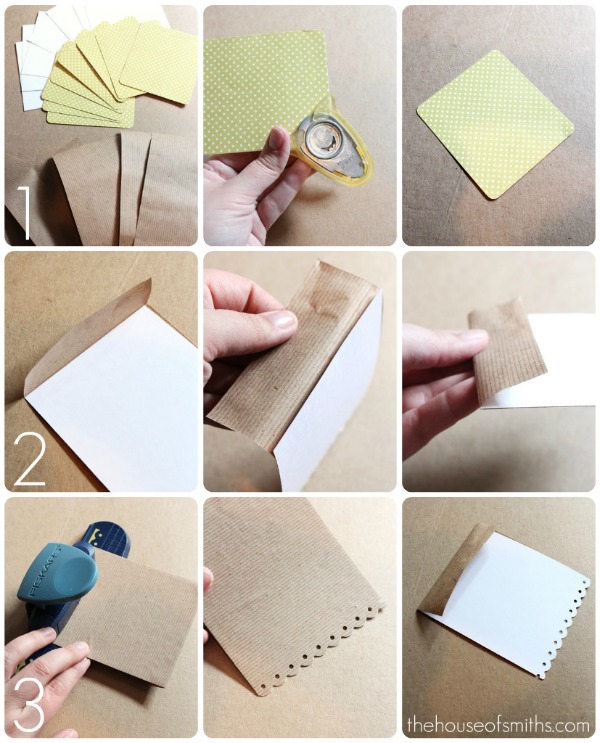
1. Cut some regular cardstock into 5 x 4 inch pieces. Then take some brown paper and cut it into 6 x 4 inches pieces. Next, take some patterned cardstock paper of your choice and cut it about 3.5 x 4 inches.
Got that? 🙂 Basically you’re going to be laying them.
My brown paper was just some ‘natural’ wrapping paper that I picked up from Target about a year ago, but you can easily use the backside of a paper grocery or lunch bag too! Anything that has that “natural/earthy” look. The reason for the white cardstock is because I wanted my banner to be sturdy, and the brown paper was too thin. If you use a thicker material, you could probably opt out of that step all together.
2. Glue the brown paper onto the white cardstock, leaving a 1 inch flap at the top. You will bend this down later, to have a place for the twine to go through, so you can string the letters.
3. Use an edger punch (I got mine from Michael’s Crafts) or decorative scissors to embellish the end of each “flag” on the banner.
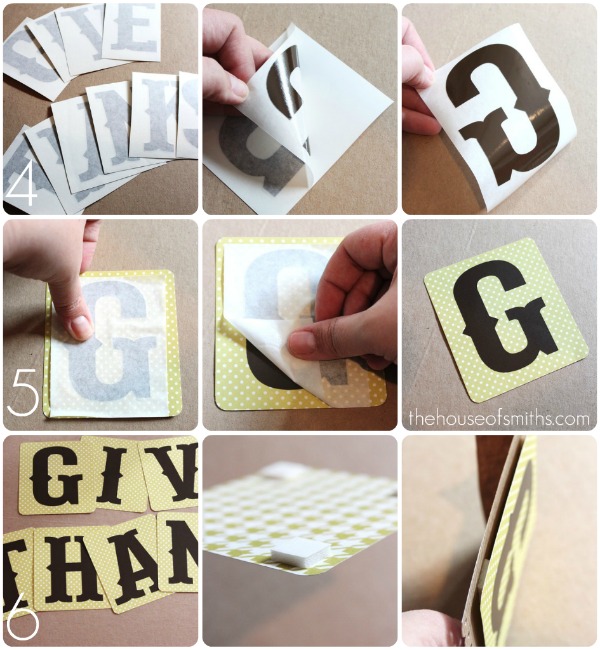
4. One at a time, peel off your GIVE THANKS vinyl letters from their paper backing.
5. Apply them onto your patterned paper, and rub lightly with your finger over the letter, to adhere to the paper. Peel back the transfer tape to reveal the vinyl on your cardstock.
6. After each of your letters are done, use some foam adhesives on the back of your patterned paper and apply onto your brown paper base.
You don’t have to use foam adhesives, but it just gives the letters some dimension.
7. Use some twine, lay it down behind the brown paper flap, adhere double stick tape to the brown paper side and stick it down onto the cardstock. This way you can move your letters freely, but they will still stay put.
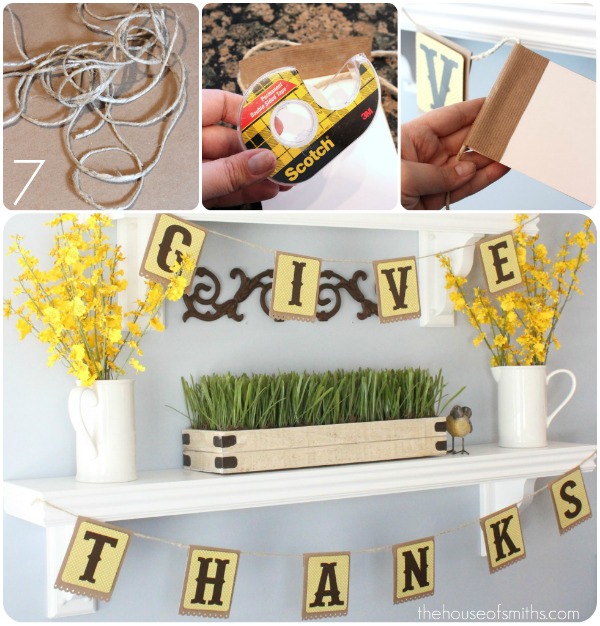
Quick, easy, simple Thanksgiving decor and crafts that anyone can do! 🙂
And if you’re feeling even more festive you could totally add some additional embellishments to your banner to make it personal! Like a gathering of leaves, acorns, or even some glitter around the edges!

As I mentioned before, we sell a bunch of the stuff you’ll need to pull of YOUR Thanksgiving decor, in our House of Smiths Design Shop!
From this post, these are the items that you can purchase to make your decorating just that much EASIER!


We’ve also listed these fun decorative chalkboard labels, on their own in a couple of different sizes on the shops site as well, if you want to purchase those separately. You can do some really fun things with them!


Happy Tuesday!

Clark's says
Can I ask where you got the table cloth from?
MHS 2002 says
I've recently have been obsessed with chalkboard and I completed my first project! I might just carry my love for chalkboard on to Christmas…those tags would make an adorable gift tag.
You can check out the post at hawsfamilyblog.blogspot.com/2011/11/diy-chalk-art.html
Unknown says
Looks great! Love your name plaques! Great idea:)
Unknown says
LOVE EVERY SINGLE DETAIL. So beautiful. Well done friend. winks, jen
Ingrid says
love it! where did you get that table cloth? i love the fabric!
a says
Adorable.
Anonymous says
where did you get your little turkey?:
Classy Clutter says
Obsessed with it all! As usual! I made your ballard inspired shelves this weekend and I'm in love with them! Now I know exactly what to put on them for Thanksgiving! You're awesome!!!
Mallory @ Classy Clutter
jamie says
You out did yourself again! Where can I get plate holders like yours?
Julie {Angry Julie Monday} says
Beautiful!!! Love it all!!!
Lil Mama Stuart says
I was going to say, that fabric is so pretty! But really…a Target table cloth!? Great find, thanks for the tip!
Bud & Kim says
Looks beautiful Shelley!
Andrea @ Keepin it Thrifty says
WOW WOW WOW –everything is simply AMAZING!!! you go GIRL!
Unknown says
Gorgeous, as always, girl! Love it! I amy have to add a bit more "Thanksgiving" to my fall mantles.
Jenny @ Simcoe Street says
It's amazing! Great tablecloth, great place-card seat tags, great everything!
Jenny
simcoestreet.blogspot.com
Anonymous says
Oh, it looks beautiful! Love how fresh it all looks. Especially like the chalkboards on the chairs. 🙂
Tammy says
Today I am Giving Thanks for the gift of discovering your beautiful and inspiring blog. I just spent(with a cup of coffee in hand and my puppy Tinker on my lap)some time going through some of your past blog entries and tutorials. I have found a new favorite place to visit and my, honey me and you do list, just got bigger…lol!
Love and happiness,
Tammy :0)
Krista@RustikChic says
Beautiful! Love the chalkboard decals. Shared it on FB:)
To The Moon and Back says
Seriously awesome! I thought I was the only crazy one putting up Christmas decorations already. I want to be able to enjoy them as long as possible:)
Unknown says
New follower – I'm also a House of Smith's! LOL. These are great ideas – I make the placecards at our Thanksgivings too. Hope you will follow back at momma-licious.blogspot.com
Nancy@owensolivia says
I love the star! and the table cloth and the turkey and . . .
You misspelled "spruce" at the top, so ya might want to fix that. 🙂
Kelly says
I LOVE your blog! I recently found it and can't get enough of it. I just wondered where you found your white shelves. I have been looking for white shelves but they are all too narrow and can't fit anything wide on them. I noticed you have vases, round turkeys etc and they all seem to fit great. I would love to know kellyahlander[at]yahoo.com
Jenn says
Your Thanksgiving table is beautiful! I really love your hanging place cards – genius! 🙂
Jenn
Just Us says
So pretty!
I saw you today on the news. You looked beautiful. It was fun hearing how you got started. Congratulations on your success. I think you guys are pretty amazing.
Unknown says
Cute Cute and More Cute! Love every bit of it!!! I'm your newest follower and would LOVE for you to come visit and follow me, too!!!
Aimee @ ItsOverflowing.com
J says
What is the paint color? I love it!
Charlene Austin says
I absolutely love your decorations! So classy and inviting! Good job!
Amelia says
love it ALL!!! amazing work as always shell 🙂
Pearl says
Absouletly PERFECT! Every last detail.
The Give Thanks Banner is sooo cute!
Love!! You go girl!
♥
Pearl
KelBel says
Just checking– the paint color on the walls is the gray you have listed on your home page, correct?
A. Drewes says
Just passing through as I stumbled upon you blog. LOVE this one!!